Showing posts with label Southern Gentleman DIY. Show all posts

Saturday, June 24, 2017

Cowboy Boot Wine Bottle Holder - Up-Cycle!


Any good southern working man knows that a fresh pair of boots is very important! However, those old boots you haven't worn in a while might have sentimental value. Instead of throwing them out, why not turn them into something unique and useful?

Over the years I have been looking for the perfect project to recycle my old boots. This project is very basic and can be completed by anyone at any skill level.

Materials:
                Pair of old cowboy boots (usually on their "last leg")
                3/4" wood (other thicknesses can also be used)
                Furniture upholstery tacks
                Stain and Polyurethane

Tools:
                Jigsaw
                Razor Blade
                Hammer
Time:
                2 hours hands on, 5 hours total (Drying)

Step 1: Prepping the Boots


The first step is to cut off the top of the boots so that you can get the inside diameter of the boots. I recommend using a razor to make a clean cut in the leather. I used a rotary razor blade to make this cut, but a standard straight razor will work as well!  


Step 2: Cutting and Staining Wood Bottoms

To get a clean, smooth look the bottom wood base needs to fit tightly in the base of the boot. To achieve this look, measure the inside of the base of the boot and cut a wooden circle that size. My boots ended up being 5-7/8", which is the diameter I cut the 3/4" wood circles to. Following the directions on the respective containers, I then stained and applied polyurethane to both sides of the wooden circles with some extra stain and polyurethane I had leftover from a different project. I used an old rag to stain the wood and a foam brush for the polyurethane. It typically takes 1 hour for the stain to dry and three hours for the polyurethane to dry. Each brand is different and you should follow the recommended drying instructions found on the product's label. 


Step 3: Assembly

The final step is to attach the cut boots to the stained wooden circles. I used upholstery  tacks to accomplish a clean finished look. I spaced the upholstery tacks apart evenly around the wooden circle, hammering them through the leather of the boot and into the wood. I found these upholstery tacks on amazon.com for a couple of dollars. There are many different styles of tacks to choose from. 


After hammering in the upholstery tacks around the wood circle, there will be extra leather hanging down past the wood. I used a rotary razor to cut this excess leather off for a clean cut look.


Final Product!!

Other than holding wine, these boots can be used as utensil holders, flower vases, table center pieces, etc.  


Monday, February 6, 2017

Installing Larger Exterior Door

Hello my fellow DIYers!

It has been awhile since my last post, but I have a good one here that I would like to share!

Recently I noticed that the door to my garage was rotting near the base were the rain was splashing off the concrete side walk. My original intent was to remove the trim around the door and replace it with Hardie Plank boards to prevent it from happening again and just ignore the door damage until it got worse. This would have been such a simple repair I wouldn't have even posted anything about it. Well I ended up receiving a FREE door from one of my coworkers who used it temporarily when working on his house. It was perfect! Metal exterior door with insulated Star energy ratings (no more rotting)! But of course it isn't that simple. The door was 4" bigger than my existing door. 

Original 32" Door
(you can see the rotting wood on the bottom left)
So here are the steps I took to finish this door out and what I did to make everything look like it did when the builders first installed the door.

Materials:
(1) Exterior Door
(1) 2"x 4"x 10'
(1) 2" x 12" x 8'
(1) 2" x 4" x 8'
(2) 2" x 4" x 12' (Hardie Plank)
Hurricane Straps
Framing nails and 2.5" screws
Wood putty
Paint  

Step 1: Scoping and Demo!

The first step in completing this project was scoping out how I wanted to shift the framing of this door way. To keep things simple I shifted this door all on one side and kept the original door handle side the same. This was also were my electrical switch was and I did not want to mess around with having to move my electrical wires.

Notice the Electrical on the right side of door

Actual Door Frame Removed
I then moved to the demo stage. I needed to open up the framing of the doorway by 2" which required me taking out the original studs put in the doorway. To do this I used a hammer and pry bar as well as a metal blade on my reciprocating saw to cut out the stubborn nails. I was able to savage most of the hurricane straps from the original framing and ended up reusing them when going back at the end. This process ended up taking longer than I expected. I took my time in not damaging anything that would be difficult to replace such as the house siding.   

Top 2" x 12" Board Removed
Before removing this 2" x 12" board I did cut the 2" x 4" board that would be the replacement for the new side frame and put it in place. I am sure the house wasn't going to fall over in such a short time, but I put it in place just to be safe. When sizing this new hole I added an inch on the overall size of the new door frame. My frame was 37.5" from outside to outside of the frame. So I cut a new hole in my wall 38.5" to give myself additional room for shimming.  

I marked all of my cuts before I started. I did not want to make a mistake here and end up having to repair siding. I then moved on to cutting the siding and opening up the actual hole in the house. I used a concrete blade on a grinder to get a smooth cut. This surprisingly worked really well and I was able to get a smooth cut all the way through the hardie plank siding. I then used a circular saw to cut through the OSB wood on the inside. 

Concrete Blade on Grinder

Opened Hole for the new door frame
To reinforce the hardie plank siding I used my nail gun to replace the nails that were cut off when widening the siding. These nails will be covered at the end with the new hardie plank trim pieces. 

Nailing Siding Back
Step 2: Going back with the new Frame

This step is really easy for those who have ever build a new wall or have ever completed framing on a house before. For those who haven't seen this before I used my nail gun to toe in the 2" x 4" boards into the existing top and bottom frame pieces of the wall. I then reinstalled the hurricane straps on both the top and bottom of these boards. 

Toed Board
Hurricane Strap Reinstalled
Next I went back with the longer 2" x 12" board on the top of the frame. These boards were originally 2 2" x 12" boards with a piece of OSB between them. I was able to pull out original OSB and put it between the new longer boards. I did put the OSB in half so that it would be more distributed on the outsides of the sandwiched board. Nails were also put into all three of these boards before going back. The new boards were then toed back into the original vertical studs and also nailed horizontally from the side studs. I also went back with hurricane straps like there were originally built. This finished the framing time to move to the door install!

Original OSB Sandwiched between
the 2" x 12" boards

Toed into original Vertical Studs
Step 3: Installing the new Door Frame

When installing the new door frame there will always be gaps on the sides and top to allow for shimming when squaring up the frame. This is the extra inch that was put into the new hole when I cut open the exterior siding.

I started with the door handle side of the frame making sure to use a level on both the top, bottom, and side of the frame. I then used shims and the scrap hardie plank siding to lock everything in place. I used natural wood shims on this project and after completing this step I should have used the composite shims. The natural wood shims are only going to rot with time and also when nailing through these shims they like to split and break on you. 
Use Composite Shims!! Not these

Shimming Sides of Frame

More Shimming. I used the cut off
Hardie plank for additional thickness

The shimming and squaring of the door frame is a two person job. Having those extra set of hands is a must to get this frame perfect and not having the door drag on one side when opening and closing. I used both the nail gun and 2.5" screws on this frame to make sure it isn't moving. The screws are great for making small adjustments in or out on the frame, but the nail gun is much quicker!

The final product of this build was a new door that is not going to rot in the future! I was very happy with the way it came out and very pleased with the whole project. I did go back with hardie plank trim that I did not talk about, but you can see it in the final pictures below. 

Finished Inside
Finished Project Outside before Trim

Finished Project Outside after Trim and Paint


Sunday, September 4, 2016

Laundry Room Shoe Rack / Bench

For years I have been wasting space in my laundry room. My laundry room is laid out where I have this area off to the side that was used as storage and for awhile this cheap drying rack was shoved in the corner. 

So to improve my livable/workable space I have decided to build a bench to store all my shoes as well as a place to sit down and put on my shoes.

Before:


After:

Finished Project! 


Tools you will need:
Tape Measure, Pencil, Safety Glasses, Ear Protection, Sander, Circular Saw, Drill, Kreg Pocket Hole Jig, Kreg Rip Cut Jig (optional), clamps, and Painting Supplies

Materials:
1 pre-sanded plywood 4x8 sheet
Kreg self tapping screws
Primer
Paint


Step 1. Planning and Designing

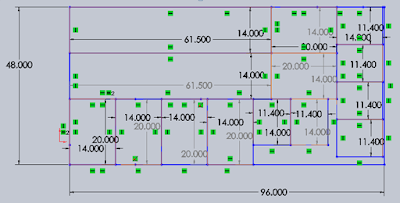
I started by measuring out the space I had to work with. The width of the room (floor molding to floor molding) was 61.5". To keep things simple and to make it where if I do not like the bench in the future I wanted to keep the floor molding intact. An alternative method would have been to cut the molding next to where the bench would be and have the bench permanently installed against the sheetrock. By choosing not to cut out the molding, I am going to use a slightly larger cushion on top to cover the gap between the walls. This will also give the bench a built-in look without having to actually cut anything.

The next step was figuring out how I wanted my shoe to be laid out.  I need higher cubicles for my work boots and cowboy boots and wanted smaller cubicles for the tennis shoes and for the ladies' shoes. I also wanted to have plenty of room to be able to sit on top and have a place to put on my shoes. So I made the width of the bench 14" (extra deep for those side 13 shoes) and an overall height of 21.5" for a comfortable bench. All other measurements are shown below.  


Step 2. The Build

To try and keep the cost as low as possible, I am going to paint this bench white to match the trim in the room. By doing this I can use sanded plywood instead of a furniture grade hardwood plywood.

I started out with laying out my cut sheet. Like any DIY project I want to do it right the first time and at the cheapest cost. Here is how I figure out how I was going to make all my cuts on one sheet of plywood.

Sorry for the busy image. Not easy to show all my cuts without all the clutter 
Note: I did not leave any extra room in this drawing for blade thickness when cutting. This is something that should always be considered. Remember measure twice cut once!

Package includes: Rip Cut, Kreg Jig, and Shelf Pin Jig

When making the cuts I tried out Kreg's Rip Cutting Jig. This was the first time I have ever used this jig and like their Pocket Hole Jig I loved it! It made cutting this work so much easier than having to eyeball a line going down the whole length of the board.

Pretty impressed with the Kreg Rip Tool!

After I made all my cuts I went over all the edges with a sander to just keep everything clean and smooth.


The next step is attaching all the boards together. I am a huge fan of the Kreg pocket hole jig! I have used this jig in countless projects and this project is the perfect application for the Kreg.

I am using two pocket holes on each side of all the boards (except the top and bottom). This should allow for plenty structural support once everything is put together.

Don't forget your safety gear when working!

Once you have all your pocket holes drilled it's time for assembly! By using pipe claims you should be able to assemble the whole bench by yourself. I also like to use these claims to hold my joints nice and tight while I am screwing in the self tapping screws.

The Start of the Assembly

Step 3: Finishing

With the build complete time to move on to the paint. I ended up using an oil base primer that I already had from a different project. Although an oil base primer isn't really required for this bench I prefer to use the oil base on raw wood. I find it last longer and looks better.


Once the primer is on time for the final paint. I am using the same white trim paint that is used throughout my house. You should apply at least two coats for furniture like this where people will be sitting on it and having constant direct contact with the paint. 

First coat of white paint after primer
All Painted!!

Test fit after painting
Step 4: Enjoy!

In addition to this shoe bench I also hung a rod over the bench for drying clothes and I had this cushion custom made to set on top. 


Sunday, August 21, 2016

Hidden Cabinet American Flag - Red Stripe

Any Southern Gentleman will tell you that he is proud to be an American. True American's work hard and know that freedom isn't free! So to show my support for our fellow American's out there; I have decided to dedicate my first DIY post to those who serve as our local heroes, American fire fighters.


This decorative subdued black and white color flag supports our fire fighters with a single red stripe in the middle. However, this red stripe could also be changed to blue (police), orange (EMS), etc.
To make this flag even cooler than what it is I have also added a hidden compartment behind the field of stars. This hidden compartment allows for a perfect hiding spot for a pistil or anything you would want to keep hidden in plain sight.

Tools you will need for this project include:
Tape Measure, Speed Square, Pencil, Safety Glasses, Hearing Protection, Sander, Brad Nail Gun, Circular Saw, Drill, Kreg Jig, and Clamps

Materials needed:
12' of 1x4 Common Board or a Knotty Pine
25' of 1x2 Common Board or a Knotty Pine
14" 1x12 Common Board or a Knotty Pine
Ebony Wood Stain
Kreg Self Tapping Screws
White Paint
50 Star Stencil
Stencil Paint
2 European Cabinet Hinges
Magnetic Child Safety Lock

Step 1: The Plan

I started this build by drawing on my computer how I wanted the flag to look and also how I wanted to add the hidden compartment. What I decided on is a 30" x 19" frame that used 13 strips of 1x2 for the stripes. With wood dimensions not being exactly as they are called the actual size of a 1x2 is 0.75" x 1.438" (give or take a little). So to give it some distancing between each stripe I made the overall height 19". I also knew that I would need to have support for the shorter stripes on the right side of the field of stars and I wanted to have a stop for the field of stars cabinet door, so I added two vertical 1x4 in the middle of the frame as soon in the image below.


I then laid out all of the stripes and the field of stars in my drawing leaving some spacing between the stripes to allow for irregularities in the wood. You will also see a gap underneath the field of stars so that the cabinet will not hit the red stripe when opening and closing. There are four lengths of stripes. A 16" and a 17" stripe is used to the right of the field of stars and a 30" and 31" is used on the lower section of the flag.


Step 2: The Build

I first started with the frame. By using 1x4 cut to the lengths shown above in the planning section I got my roughed out frame. I then used the Kreg tool to place two pocket holes at each end of the vertical 17.5" boards. I did not put any pocket holes in the 30" horizontal boards. By using clamps I screwed all vertical boards into the top and bottom 30" boards. I finished out my frame by placing the 12.5" horizontal board in the location shown in the plan.

Forgot to take a picture during the build here it is at the end.
My next step was cutting all of the stripes. This went relatively quickly and after cutting them all out I laid them out on the frame. As for an additional step I wanted to soften the look the stripes and the whole flag. So I used a round over bit on my router to cut the corners on all sides of each of the stripes. This probably isn't necessary, but I thought it add a little extra to the look.


 Next came the field of stars. I wanted to keep with solid look of the field so I used a 1x12 board to make this field. I cut the 1x12 to a 14" length to start with then made a second cut to create the final size of 10" x14". And again to add something extra I rounded off all top corners and edged with a round over bit. The last step in making the field of stars is attaching the European hinges. I used a 35mm cabinet hinge drill bit to drill two holes on the inside of door. When doing this keep in mind that you need a 3/4" overhang for the door.


Now that all my pieces are cut and smooth. I started the staining process with Ebony wood stain. I applied two coats of stain on each board before I assembled everything to make sure I did not miss any sides. After the stain dried I used a rough natural haired paint brush to apply an uneven coat of white paint on the needed stripes. I also did this to the one red stripe as well.
The last painting step was painting in the stars. By using a stencil that I bought online, I stenciled on a field of stars with different levels of paint brush loading. I wanted to create an uneven pattern of white on all of the stars.

Step 3: Assembly 

The final step in this whole process is assembling the flag. I used a brad nail gun to complete the assembly. There are two brad nails on each side of every stripe and an additional two nailed on the 30" and 31" stripes in the middle. The cabinet door was also screwed together with two soft closing hinges and as a final touch I used a magnetic child proof lock on the cabinet door.  

Added foam to the inside of the cabinet to hold pistal


Perfect for the bachelor pad!
Or the bedroom if you ask the wife really really nicely!