For years I have been wasting space in my laundry room. My
laundry room is laid out where I have this area off to the side that was used as
storage and for awhile this cheap drying rack was shoved in the corner.
So to improve
my livable/workable space I have decided to build a bench to store all my shoes
as well as a place to sit down and put on my shoes.
Before:
After:
Tools
you will need:
Tape
Measure, Pencil, Safety Glasses, Ear Protection, Sander, Circular Saw, Drill,
Kreg Pocket Hole Jig, Kreg Rip Cut Jig (optional), clamps, and Painting
Supplies
Materials:
1 pre-sanded plywood 4x8 sheet
Kreg self tapping screws
Primer
Paint
Step 1.
Planning and Designing
I started by measuring out the space I had to work with. The width
of the room (floor molding to floor molding) was
61.5". To keep things simple and to make it where if I do not like the
bench in the future I wanted to keep the floor molding intact. An alternative method
would have been to cut the molding next to where the bench would be and have
the bench permanently installed against the sheetrock. By choosing not to cut out
the molding, I am going to use a slightly larger cushion on top to cover the
gap between the walls. This will also give the bench a built-in look without
having to actually cut anything.
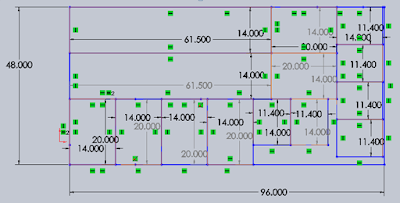
The next step was figuring out how I wanted my shoe to be laid
out. I need higher cubicles for my work
boots and cowboy boots and wanted smaller cubicles for the tennis shoes and for
the ladies' shoes. I also wanted to have plenty of room to be able to sit
on top and have a place to put on my shoes. So I made the width of the bench
14" (extra deep for those side 13 shoes) and an overall height of 21.5"
for a comfortable bench. All other measurements are shown below.
Step 2.
The Build
To try and keep the cost as low as possible, I am going to paint
this bench white to match the trim in the room. By doing this I can use sanded
plywood instead of a furniture grade hardwood plywood.
I started out with laying out my cut sheet. Like any DIY project I
want to do it right the first time and at the cheapest cost. Here is how I
figure out how I was going to make all my cuts on one sheet of plywood.
 |
| Sorry for the busy image. Not easy to show all my cuts without all the clutter |
Note:
I did not leave any extra room in this drawing for blade thickness when
cutting. This is something that should always be considered. Remember measure
twice cut once!
 |
| Package includes: Rip Cut, Kreg Jig, and Shelf Pin Jig |
When making the cuts I tried out Kreg's Rip Cutting Jig. This was
the first time I have ever used this jig and like their Pocket Hole Jig I loved
it! It made cutting this work so much easier than having to eyeball a line
going down the whole length of the board.
 |
| Pretty impressed with the Kreg Rip Tool! |
After I made all my cuts I went over all the edges with a sander
to just keep everything clean and smooth.
The next step is attaching all the boards together. I am a huge fan
of the Kreg pocket hole jig! I have used this jig in countless projects and this
project is the perfect application for the Kreg.
I am using two pocket holes on each side of all the boards (except
the top and bottom). This should allow for plenty structural support once
everything is put together.
 |
| Don't forget your safety gear when working! |
Once you have all your pocket holes drilled it's time for
assembly! By using pipe claims you should be able to assemble the whole bench by
yourself. I also like to use these claims to hold my joints nice and tight
while I am screwing in the self tapping screws.
 |
| The Start of the Assembly |
Step 3:
Finishing
With the build complete time to move on to the paint. I ended up
using an oil base primer that I already had from a different project. Although
an oil base primer isn't really required for this bench I prefer to use the oil
base on raw wood. I find it last longer and looks better.
Once the primer is on time for the final paint. I am using the
same white trim paint that is used throughout my house. You should apply at
least two coats for furniture like this where people will be sitting on it and having
constant direct contact with the paint.
 |
| First coat of white paint after primer |
 |
| All Painted!! |
 |
| Test fit after painting |
Step 4:
Enjoy!
In addition to this shoe bench I also hung a rod over the bench
for drying clothes and I had this cushion custom made to set on top.


No comments:
Post a Comment